Thursday, June 27, 2013

It looks like a...what?

I designed myself a fancy little banner last night while Denny was asleep, so I just pulled up the ol' bloggeroosky to show him the fruits of my late-night labor.

"Oh," he says, "it looks like a hot dog."

Um, what?

Back to the drawing board, I guess.

Anyway, I'm a slacker and haven't started any of my 4th of July decorating yet. My attention has been on a certain pretty little buffet in my garage that I've been sprucing up with some paint and some good old fashioned distressing. Looking forward to getting that done so I can dress it up for the 4th!


Wednesday, June 26, 2013

End Table Makeover

(Otherwise known as the project that took me FOUR MONTHS to finish.)

What happens when you buy a house, decide all furniture you currently have you don't like anymore, but have a shoestring budget and $400 for a coffee table and $250 for EACH side table makes you want to cry a little?

You troll for other people's unwanted used stuff and fancy it up to make it your own.

It's all the rage, friends, all the rage.

You might remember when I mentioned my thrift store shopping spree, in which I picked up this coffee table


and two end tables. Well, they'd probably make better nightstands and I'm sure that's what they were, but I took some design liberties here and threw these bad boys (errrr...girls. They're definitely female furniture pieces) in our living room:


The ladies. Stella and Sandy.

Aren't they pretty? Sure, they were covered in super thick paint layers that didn't cut it in the new house, but the solid bones (dovetail joints, NICE) and faaaaancy delicate hardware made them ideal candidates for the new house. Plus, those legs...I die. So I sent Denny a photo and upon his approval (so trusting, he is) I crammed both pieces into my Chevy Malibu and off we went. Me, Stella, and Sandy. And my mom (thanks, mom!)

The next step was figuring out how I was going to re-do these pieces. Obviously, the paint needed to come off. It was thick and chipped and really not that nice to look at at all.

I have zero experience with removing paint from anything, so I was a little apprehensive. I used this step by step process on how to remove paint (love this blog), hit up Home Depot, and was ready to plan my attack.


My arsenal:


Some heavy duty gloves, Kilz spray primer, Citristrip, sanding pads,
cheap paint brushes, wood putty (which I didn't use), and a couple different types of putty knives
(not pictured: my electric sander and six cans of Rustoleum Heirloom White..
I had two and half cans left when I was done)

And so I removed their hardware got to work. Here they are unsuspecting of their fate:

Fronts of drawers facing the wrong way, GO ME.

I brushed on some Citristrip (with my cheap brushes so I didn't feel guilty about just tossing them in the trash) to each piece and after about 25 minutes I had some bubble-age:


I waited another 40 minutes or so (this stuff says you can leave it on for up to 24 hours, but naptime is only so long and I had to put all of this stuff back into a storage shed). So I grabbed by plastic scraper doodad and gave it a try:
Success.

And I continued on my merry way, scraping and scraping and scraping:


See those fabulously beveled edges? Maybe you can't because these photos are awful? Can you say major pain to get paint out of? At this point, my plastic scraper doodad was getting tired, so I whipped out the metal putty knife and finished the job (taking care not to gouge the wood). Kind of.


As you can see, I didn't get it all off on the first try, but I did get most of it off! At this point, Peyton was awake and I had to put everything away, so these tables did get a second coating of Citristrip and another good scraping the next day. 

A few things to note about stripping paint:
  • Test your furniture to make sure that it does not contain lead paint. Lead is no good and causes a TON of problems and shouldn't be sanded or stripped due to releasing gases and other toxic yuck into the air that will MESS YOU UP. You can buy tester kits at Home Depot.
  • It is messy. Be sure to cover your work area, because you will totally have peely, mushy paint everywhere.
  • Wear clothes that you don't mind getting ruined. This seems like a no-brainer, I know. I never learn and think I can do projects in a nice blouse and a pair of jeans and I'll just be extra careful. I got a drip of the Citristrip on my perfectly good, non-project jeans and I swear it was like it was trying to eat a hole right through them. Now my non-project jeans are project jeans because of the big old looks-like-bleach spot on them.
  • Which leads me to my next note: gloves are good. If the Citristrip did a number on my jeans, imagine what it would do to skin? No thanks.
  • And then my next note: Citristrip claims that it can be used indoors. It doesn't smell too bad, pretty nice actually, but I worked on this part of the project outside anyway. I did not wear a mask, HOWEVER, I have read that there are other paint thinners/strippers that are downright potent so PLEASE remember to wear a mask :)
  • Make a day of it. I really thought that maybe, just maybe, I'd have both tables, stripped, sanded, and primed in a few hours time. But when you have a feisty toddler, it's not really likely to happen. Ideally, I could have left the stripper on even longer and saved myself the unnecessary task of applying another coat the next day. This is why this project took me four months; between the time it took to complete each step, mixed with moving, our wedding, and Peyton's birthday, this was a slooooow moving process for me.
Next up was sanding and priming:


I had the best of intentions of protecting my father in law's yard from overspray.
As you can see, that was a BIG FAT FAIL.
I used Kilz spray primer and gave it two coats. And then I gave it a quick sanding because the primer dried and left a gritty finish. After wiping it down to remove all the dust and dirt, it was time to paint!

(Note: I don't have many pictures of the remainder of the process because Denny was Peyton-wrangling while I finished the next steps, so I had no one to help with the photo taking...whomp whomp).

I used Rustoleum Heirloom White in a gloss finish. A few light and even coats later, painting was done. If you want some tips on spray painting furniture, I suggest you check out All Things Thrifty for some excellent pointers. An important thing to remember...light and even coats. If you're too heavy handed you will wind up with a drippy mess that you'll have to sand AGAIN. If you're like me, sanding is not my favorite thing to do.

I let the paint cure for a few days, and then I decided I really wanted to bring out some of the detail that I loved so much about these beauties: the beveled edges on the tops of the tables and the carved insets on each side of the drawers.

So I picked up some Martha Stewart Faux Finishing Glaze at Home Depot, mixed a little bit of that with a little bit of black acrylic craft paint (from Michaels or your favorite craft store), and started glazing. No joke, I had read that it was impossible to mess up, and it is indeed impossible to mess up. Paint can be a scary thing, but you have to just remind yourself that it can be fixed. Just go with it!

A tip on glazing: a little goes a long way. I mixed way too much and was left with a ton of black-tinted glaze and no way to store it, so I wasted a LOT of glaze. You live and you learn.

Glazing is pretty easy: just slather it with a brush onto your piece in the spots you want to add some more detail, making sure to get in the nooks and crannies (English Muffins, anyone? I'm hungry.), and then wipe it off with a damp cloth. Easy peasy!

Once that was done and dried, I added two coats of Minwax Polycrylic to the tops of the tables (remember to sand lightly with a high-grit sandpaper after each coat dries!) and let that cure for three days in our garage (yes, at this point we were in the new house).

And then I was left with this:

Hello, gorgeous. Nice to meet you.
Stella and Sandy are currently flanking each side of our brand spanking new sofa, four months after I first laid eyes on them, and I think they look fab. Sassy and classy at the same time, if you will.

The total cost of this project:
End tables: $65.00 for the pair
Electric sander: already owned
Sanding pads: $10.00
Citristrip: $12.00
Kilz primer: $18.00
Rustoleum Spray Paint in Heirloom White: $23.22 (remember, I bought six cans, but I had almost two and half left for other projects after I finished these two tables and the coffee table)
Two cheap paint brushes: $3.00
Putty knife: $3.50
Wood putty: $3.00 (I didn't need it, but at least now I have it!)
Gloves: $5.00

Total for this project: $142.72
Per table cost: $71.36
Savings (vs. if I had purchased end tables at $250 a pop, YEAH RIGHT): $357.28

What do you think? Ever had a project that felt like it took FOREVER, but totally paid off in the end?

UPDATE: Psssst...feel free to check out my Buffet Makeover once you've seen the end tables :)


Linking up at:
Sugar and DotsCity FarmhouseThe Shady PorchThe Shabby Creek CottageHouse of HepworthsThe Crafty Blog StalkerIt Happens in a BlinkKreative CreationzFinding FabulousFrench Country CottageThe Shabby NestMiss Mustard SeedThe Pin JunkieBlissful and DomesticBeneath My Heart


Changes are a-Comin'

I put my Etsy shop on vacation this morning. Maybe permanently, maybe not. After six months of being open, I feel like I did fairly well for myself given the saturation in the market I was in. Seven sales in four months...I'll take it. My last sale was in April, so given the move and the chaos that comes with the move (and a wedding), I just haven't had the time to put myself out there to continue.

My craft room is still in shambles, several projects for the house are underway and/or neglected, and just the sheer amount of time it takes to create, list, market, and sell effectively, something's gotta give. I value my sanity and I value my family, and I don't ever want to feel like I've bitten off more than I can chew. It's so easy to get overwhelmed when there are so many good things going on, so you have to choose what good things to keep on keeping on with.

I'm not saying my shop will be closed forever. It probably won't be. BUT I am now choosing my family and my home over the order that needs to ship tomorrow out to that person across the country. I still very much appreciate you, person across the country, and I thank you for allowing me to create for you, but it's time to shift my focus juuuuust a little. A shift to the creative, still, but for different purposes.

So with that, I feel like a blog name change might be underway. I've been brainstorming, so we'll see what I can come up with!!

Tuesday, June 25, 2013

How Paint Can Transform a Room

Before I get to the fun stuff, a short story:

Before we found that lovely little house we now call our own, we took a gander at the community about a mile down the street that was only in it's first phase of construction. It was a Ryan Homes community, and we knew several couples who had purchased and built their homes there. We loved it. We stopped by the sales office in November 2012, toured the model home, did some number crunching with the sales rep, and left because - hey - we hadn't sold our first house yet. The thought of two mortgages left us feeling a little queasy inside.

We came back in January after we actually sold the house and were living with Denny's parents. The sales rep was happy to see us and we picked up where we left off, looking at a Sienna model with a basement. There were only a handful of lots left in the first phase of construction, and we even put a deposit down on the last corner lot available. After going home and sleeping on it, we woke up the next morning with a slight amount of anxiety. THAT much money for a house? THAT much money down?

I get it, I get it, I get it. Houses are expensive, especially brand new houses. 20% downpayments are ideal. We had quite a bit of money saved up, but something didn't feel right. We didn't want to live for our house. Plus, due to the length of time it took to process permits in our municipality after Superstorm Sandy, we wouldn't have our house built until September. So we went back, got our check back, and resigned ourselves to look at resales.

And then we found our house. A month and a half later.

BAM! MLS photo in all it's glory

Surprise! Our house is the EXACT same floor plan as the house we were ready to build, only five years old, without a basement but with a morning room. We were going to opt out of the morning room with the builder because it would have been an additional $10,000 tacked onto the final cost of our freshly built house, but the basement would have been free under the builder's mortgage company's finance company incentive program.

You win some, you lose some.

But here is the kicker: the cost of our same-floor-plan-but-five-years-older-house was almost $40,000 cheaper than buying brand new. Plus, it had more property.

I feel like this is a no brainer. Obviously you know which way we went.

And now this is the story of the morning room we wanted, weren't going to get, and then got anyway.

We moved in at the end of April and I got to revel in our morning room-ownership. It's such a great room; it (coincidentally) gets the most amazing morning light, has high ceilings, two big windows, and a sliding glass door leading out to our patio. I pictured us sipping our morning coffees and reading the paper there on Saturday mornings, and turning it into a formal dining room where I could (finally!!!) host holiday dinners.

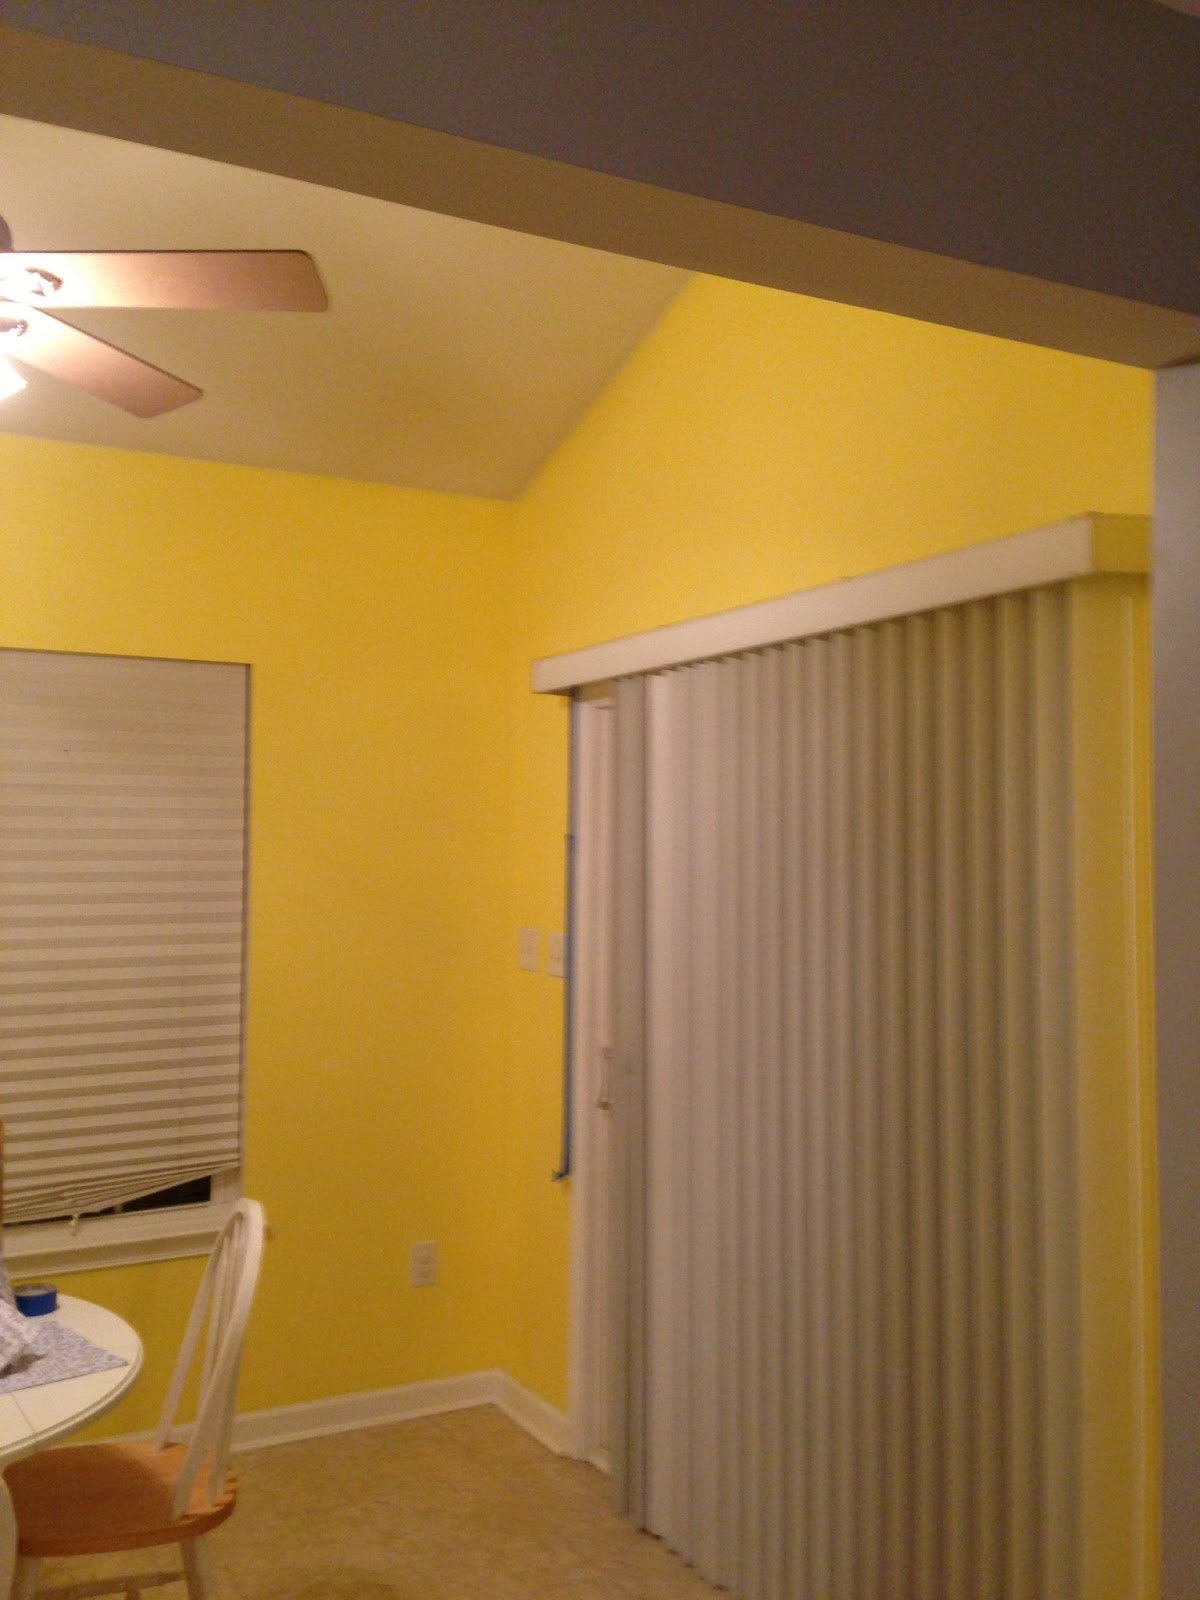
Except it looked like this:

Another MLS photo for your enjoyment

A personal photo of mine, taken at night.
This room was a HOT MESS.
Welcome to my magic school bus.
GAHHHH.

Holy yellow, batman!
Holy paper blinds, batman!
Holy vertical blinds on the sliding glass door, batman!

Literally, this room GLOWED in the morning. It was so primary yellow it cast a yellow hue throughout our entire first floor. It was the most unwelcome wake-up call every morning as we came downstairs. Our pretty little room in all it's yellow glory.

"GOOD MORNING, OWNERS! AM I BRIGHT ENOUGH FOR YOU ON THIS LOVELY MORNING? COME DRINK COFFEE IN HERE AND I WILL BURN YOUR RETINAS RIGHT OUT OF YOUR EYEBALLS. NO NEED FOR THE NEWSPAPER."

It also had paper blinds. Yes, our five-year-old morning room was sporting some dusty, brittle paper blinds. It appears that the house, once built, automatically had these blinds put in for the first owners in every window, but the owners only added REAL blinds to the windows on the front of the house. Cheater, cheater, pumpkin eater.  Every window that faces our backyard has paper blinds.

No bueno.

We are going to slowly swap out those over time, but the morning room was the first to get some new blinds action. A day after closing, we called a gentleman who owns a small business specializing in custom blinds, who we used in our previous home. He came out, measured, we chose the style we wanted (white wood to match the rest of the already installed blinds), and he said he'd be back in two weeks.

In the meantime, we had already decided we liked yellow because it really is a cheerful color and it would play off the gray paint on the rest of the walls on the first floor--just not THAT yellow. Before we even moved in, we knew it had to go.

My mind was blown...how can they be so similar yet SO different?

All I can say is that we picked...one of these. Which one, I don't rememeber (I'm terrible, I know). I can, however, tell you it was Behr Paint, picked up from Home Depot. It was a nice creamy, buttery yellow. And it was paint and primer in one, holla! I asked the kind gentleman at the 'Pot (my nickname for Home Depot...pronounced "po" if you're wondering) if we should prime separately anyway just in case since the existing yellow was YELLOW. And the kind gentleman said no, but we'd probably need two coats and that just a gallon should be enough.

Maybe next time I'll go with my gut and prime the damn room anyway because that ONE room took that WHOLE gallon of paint. I like to have SOME paint left at the end of a job, but there was a DROP left in that gallon.

It's now time to give mad props to my Father-in-Law, who finished cutting in for me and painting the whole room during Mother's Day weekend while I was out. Thanks, Father-in-Law, shout out to you!!!

I should also mention that the vertical blinds came down, HUZZAH. Replaced with sheer panels and an antiqued white rod and holdbacks from Christmas Tree Shoppe. I know these panels aren't the best quality, but I couldn't stand looking at the verticals anymore, and whenever we tried to use the sliding glass door the blinds would pop off individually and I'd be left whining about how much I hated verticals. Plus, my house was built in 2008 and not 1991, seriously. Sayonara, verticals! Sorry not sorry I had to ditch you.

So this is what the paint job looked like once we painted:

At least the table is cleared off?


BUT WAIT! You might be saying. What are those UGLY, yellowing paper blinds doing there? I thought you said you ordered new wooden ones?

You would be right, dear reader, except for the guy we ordered them from FORGOT ABOUT US. And never placed our order. So we didn't actually get new blinds installed until last week. A month and a half after we placed our order.

And here they are, better late than never, I guess:

So much better.

The final look is much airier and bright and less retina-burn-inducing-bright than it was before. Overall, I am a happy girl and am known to actually sit in here from time to time to do things (including reading the newspaper because I no longer feel like my eyes are bleeding).

A couple things left I'd like to do in here (bullet points are a girl's best friend):

  • Window treatments for the windows
  • Find an awesome dining room table that will seat at least 8. Given that this room isn't exactly humongous, I'm looking forward to this challenge. I'm thinking a 60" round table or building our own farmhouse table, but we'll see.
  • Eventually replace sheer panels at the sliding glass door with something I sewed myself
  • Add trim to windows and around the doorway into the kitchen area
  • Replace ceiling fan with a snazzy (DIYed?) chandelier
  • Add some art and wall decor
  • Find better-looking wall registers that sit so high up on that one wall. Kind of like so:

source


And really, the view out of those windows could use some fixing up, too, because I'm still looking at a giant dirt patch every day.

I'm glad we have so much to do around here, but I'm annoyed that there is so little time to do it. I'm impatient like that. I like things done yesterday, if you catch my drift.

"Weekend warrior" is an apt title, but I'd much prefer "Full-time House Ninja."

We still have a long way to go, but paint make SUCH a difference in the way a room feels. Have you ever JUST painted a room and felt so much better about it?

PS: You might be curious about what is going on with the shop. I do have the best intentions of actually creating new pieces again, but when my craft room/office is in dismal shape/only partially unpacked/a mess, it's hard to find some inspiration. My goal is to get that room together this weekend, so hopefully soon, friends!

Friday, June 21, 2013

You guys.

We had eight (EIGHT!!!) inches of rain this month. Or maybe this Spring, total. Whatever it is, there was a lot of freaking rain.

Naturally, I feel like almost half of that occurred this week, the week we had all that topsoil spread so we could start seeding this weekend.

Mother Nature, you washed away all of our topsoil and I am ANGRY.

Looks like we'll be raking and spreading whatever is left ourselves on Sunday.

Because Saturday? We're beach-bound.

That, the fact that it is Friday, and the fact that I am pulling off wearing pants at work that I sometimes wear to sleep are providing me all the comfort in the world.

Literally. Comfiest. Pants. EV-AR.