Tuesday, August 13, 2013

How to Paint a Door Red and Save Your Sanity - Part Deux


It is literally taking me weeks to finish painting this door, you guys.

What I thought would be a quick rainy Saturday project is officially taking me WEEKS. I mean, I am working 40 hours a week, volunteering my time with the youth organization 6 hours a week, and toddler wrangling and trying to keep the house from burning down the rest of my time. I am bummed out that this is taking so long.


Photo number three is where I left off last Sunday, admitting defeat for the week.

This Sunday, between prepping the powder room for it's makeover, I slapped another coat of red on the door.

And now here we are:

The blurryness is to hide my address.
I know we're all friends here, buuuuut....just in case.
And that reflection at the top of the door is horrendous.
My deepest and most profound apologies.

This also shows you a nice little glimpse of my totally insane flower beds in the front yard. The planter at the bottom left is actually from Shop Rite. The rug I found at Goodwill for $2.00, and you get a shot of my Morning Glory vine that absolutely refuses to flower, wahhhhhh.

Black is still showing through the red paint. After four coats. I wanted so desperately for this to be done. Fall is coming and I have some decor plans that neeeeeeeeed the door to be finished first. 

My uncle drove by the other day and said it looked great from the street. He told me to stop worrying so much.

As I was examining the door from the same vantage point as the last photo above, I finally declared it "okay". Yeah, the black is peeking through, but it gives it the look of a door antiqued with black glaze (which, coincidentally, I asked Denny if I could use and he vetoed the idea).

So, the door is painted. It is "done."

And now I'd like to offer up another tip to help you save your sanity: know when to call it quits. Sure, you might THINK you need to paint 14 million coats of red paint on your black door due to the fact that you failed to get primer tinted with gray to get the original black paint covered better, but know when to stop. You probably see a million flaws, but Joe Schmoe walking his dog past your house does. not. care. 

Next up for part three: door decor, and adding some season-appropriate annuals to add some more color to the space. I have calendula, petunias, and begonias planted willy-nilly around the flower beds, but I think the petunias and begonias are on their last legs. Looking forward to some mums for the fall!

Linking up to:
Sugar and DotsThe Blissful BeePlace of My TasteSouthern LovelyHouse of HepworthsThe Shabby Creek CottageThe Brambleberry CottageFrench Country CottageBlissful and DomesticMy Romantic HomeYoung and CraftyHouse of RoseStart at HomeLiving Better TogetherI Want CrazyThree Monkeys' Mommy


Sunday, August 11, 2013

Powder Room Mood Board


If you've read my Pseudo House Tour, you might have noticed my Barney powder room. 

I call it the Barney powder room because it is purple. Not just a little purple, but a lot purple. The MLS photo I shared looks like a harmless little lavender bathroom, but it is, in fact, a violet monstrosity. Because there are no windows and it's a small room, the purple walls feel very heavy and way too close for comfort.

Did I mention that purple is my least favorite color? Okay, well, now you know!

Behold, the offender:

And on the opposite (still purple) wall, about four feet away from the sink, is the toilet.
I have a closet on the first floor that is bigger than this powder room. Truth.


Not only am I dealing with severely purple walls, I'm also rocking a builder's grade light fixture and mirror, and a towel bar that is about two feet long. I'm puzzled as to why a powder room would need so many towels that such a long towel bar is required, but I stopped asking questions about a month after we moved in.

Oh, yeah...and there's LINOLEUM. High fives for linoleum! Just kidding, I know you hate it as much as I do.

I'm looking forward to lightening and brightening the space, making the walls feel less like they're closing in, and adding some accessories to make this windowless room a little more fun. Bathrooms should be fun, right?

If you are following me on Pinterest, you might have seen a "Bathroom Makeover" board pop up within the last week or so. I am a woman on a mission, I am. My Bathroom Makeover board encompasses any and all inspiration I've found for any of our three bathrooms. The powder room should feel lucky that I find it so offensive that it needs to be re-done first!

I decided to put together my first mood board (forgive some of the editing, please; sometimes I get a bit crazy with that magnetic lasso tool in Photoshop ;) to get a feel of what I'd like to see in here. 

I'm thinking lots of metals, warm floors, and a lighter paint (smell ya later, purple!)

1. Zinc Framed Mirror from Ballard Designs  2. Allen + Roth 3-light Brushed Nickel Bathroom Vanity Light from Lowe's  3. Moen Preston Single Post Toilet Paper Holder in Chrome from Home Depot  4. Moen Ellsworth Towel Ring in Chrome from Home Depot  5. Threshold Glass with Pewter Soap Pump from Target  6. Threshold Bathroom Wastebasket in Iron/Silver from Target  7. Marazzi Montagna Saddle 24 in. x 6 in. Glazed Porcelain Floor and Wall Tile from Home Depot  8. Olympic Morning Fog in Satin from Lowe's

I'm really looking forward to ditching the ridiculously long towel bar for a simple chrome towel ring and adding in some sweet accessories. Maybe I'll build some shelves over our toilet? The possibilities are endless!


The above photo is kind of how I feel right now (10 points for you if you know this movie), but I need to be realistic and realize that this is like, a 3' x 7' room I'm talking about here.

Still on the hunt for those accessories, some art options, linens, and a 2x3 rug. Any suggestions?

Linking up with:


Thursday, August 8, 2013

Apron Round-up

I've been enlisted to bake cupcakes for my best friend's daughter's 3rd birthday party next weekend, and I've been making my plan of attack and execution. It's only 4 dozen cupcakes, but if you don't know me, you wouldn't know that I am an absolute MENACE in the kitchen when it comes to baking.

Don't get me wrong, the end product always turns out well (except for that time I made a bundt cake when I was seven months pregnant and it fell apart coming out the pan and I cried for an hour), but I can make a mess like no ones business. I try to follow my mother's advice that I often hear ringing in my ears as I have clouds of flour floating around the kitchen and a granulated sugar sticky mess coating my counters:

"Clean as you go...."

Which I do, although it might not look like it. The dishes are clean, but I'll be finding powdered sugar in every crevice of my kitchen no matter how many times I wipe up after myself.

And let's not forget about my clothes. I've usually been up and about for the day, so I'm dressed and not in sweats or "lounge around the house" clothes. Which means that on a day I am baking, I am guaranteed at least three outfit changes.

I will never learn, apparently.

Has anyone checked out the ADORABLE apron options that are out there? I think I'm finally going to bite the bullet and get one of these aprons that won't make me feel so frumpy in the kitchen, and will keep my clothes clean from the baking carnage. I'm loving the nostalgia and kitschy-ness that aprons inspire, and I've found a few I want to share with you!

(Note: none of these businesses solicited my reviews or opinion. I'm offering them up because these are ones I'd pick out myself and found while I was searching around.)


This apron is so sweet, from the blue, to the polka dots, and the pretty contrasting trim. I'm a sucker for anything with polka dots.


I am absolutely smitten with this apron. It's frilly, playful, and I daresay a little sexy. It feels very 1950s to me, and I LOVE that. Can you imagine greeting your husband when he gets home from work in this number? Me-ow. This vendor on Etsy makes the cutest aprons, so be sure to support handmade businesses and check them out!


I love Modcloth for their amazing selection of clothing and accessories, but this apron makes me love that site even more. Polka dots and gingham? Yes, please. Plus, the French-loving nerd in me is loving the play on words with "mise en place". It's the perfect name for an apron.


Another gem from Modcloth, this time a half-apron. I love the sunny, bright colors and anything with a ruffle wins me over any time. I think I'd prefer full aprons, but this one is pretty sweet.


This apron is so sweet and flirty. The floral fabric and bow are sweet touches to a fantastically feminine look. Jessie Steele also sells oven mitts, lunch totes, rubber gloves (making cleaning those bathrooms sassy!), pajamas, and a whole slew of goodies.


This is another super feminine pick. Vertical stripes and ruffled floral fabric are super sweet. I feel like I'd hate to get this one dirty!

This apron looks too pretty to wear in the kitchen, but I think I would. But only with my face put on and some heels. I love the simple yet sophisticated design of this apron. It is totally timeless. Price-wise, it's the steepest choice in this round-up, but I feel like it would be worth every penny. It's absolutely gorgeous.

And I figured I'd thrown an apron in for the man in your life:


I seriously snuffled into my Diet Coke when I saw this one and immediately thought of Denny, who loves his grills. Yes, grills. The man is a fiend.

So there you have it, friends! A round-up of aprons that would make a great bridal shower gift, birthday gift, Christmas gift, housewarming gift, or a gift for yours truly.

What's your favorite out of this round-up? Do you have a favorite I should check out? Share in the comments!


Monday, August 5, 2013

How to Paint a Front Door Red and Save Your Sanity - Part One

I have long been dreaming about/swooning over a glossy red front door.


Our front door is black. It goes with our black shutters. It is boring. And, since our house faces west, the afternoon sun beats down on our front door and that door gets HOT.

Nice to see you again, MLS photo. 

Like, I've actually burned the palm of my hand on said door.

Like, I'm surprised it has not spontaneously combusted by now kind of hot (which, I guess, would make it not spontaneous). 

So, when the idea of painting the front door started floating around, I immediately knew I wanted a red door.

You might also remember that painting the front door was item numero uno on the list of summer projects I wanted to take on this summer. I will be the first person to admit I'm not nearly close to finishing that list because, um, hello? This summer has been glorious. Beach every weekend, BBQ with family and friends every Saturday, lazing around by a pool on Sundays--who has the time to tackle any projects when there's so much fun to be had?

We taped 4 different swatches of red to our front door and then immediately forgot about them and went to the beach instead. Then I remembered them and tried to remember to check them out in the morning, late morning, early afternoon, late afternoon, evening, and night. And then I forgot about them again and left them there until the heat made them curl into little paint swatch tubes and our neighbors thought we were crazy.

And then I remembered them again and promptly said:

"This one is too brown."

"This one is too purple."

"This one is too pink."

Boom.

And then settled on Glidden's Candy Apple. In my head, it is the perfect red that maintains it's redness throughout the day instead of faintly changing with the sun's position.


We had a bout of yucky, rainy weather on Saturday, so I woke up that morning with a pep in my step to get something, anything DIY-related taken care of. 

Off to Home Depot we went, and we spent about an hour or so roaming around, planning potential projects to tackle in the next few months, and I picked up some supplies: a quart of Kilz Complete Primer, and a quart of Glidden Premium Collection Exterior House Paint in Candy Apple in a semi-gloss finish.

All of the other materials I had at home, so this project was going to cost me a whopping $20.


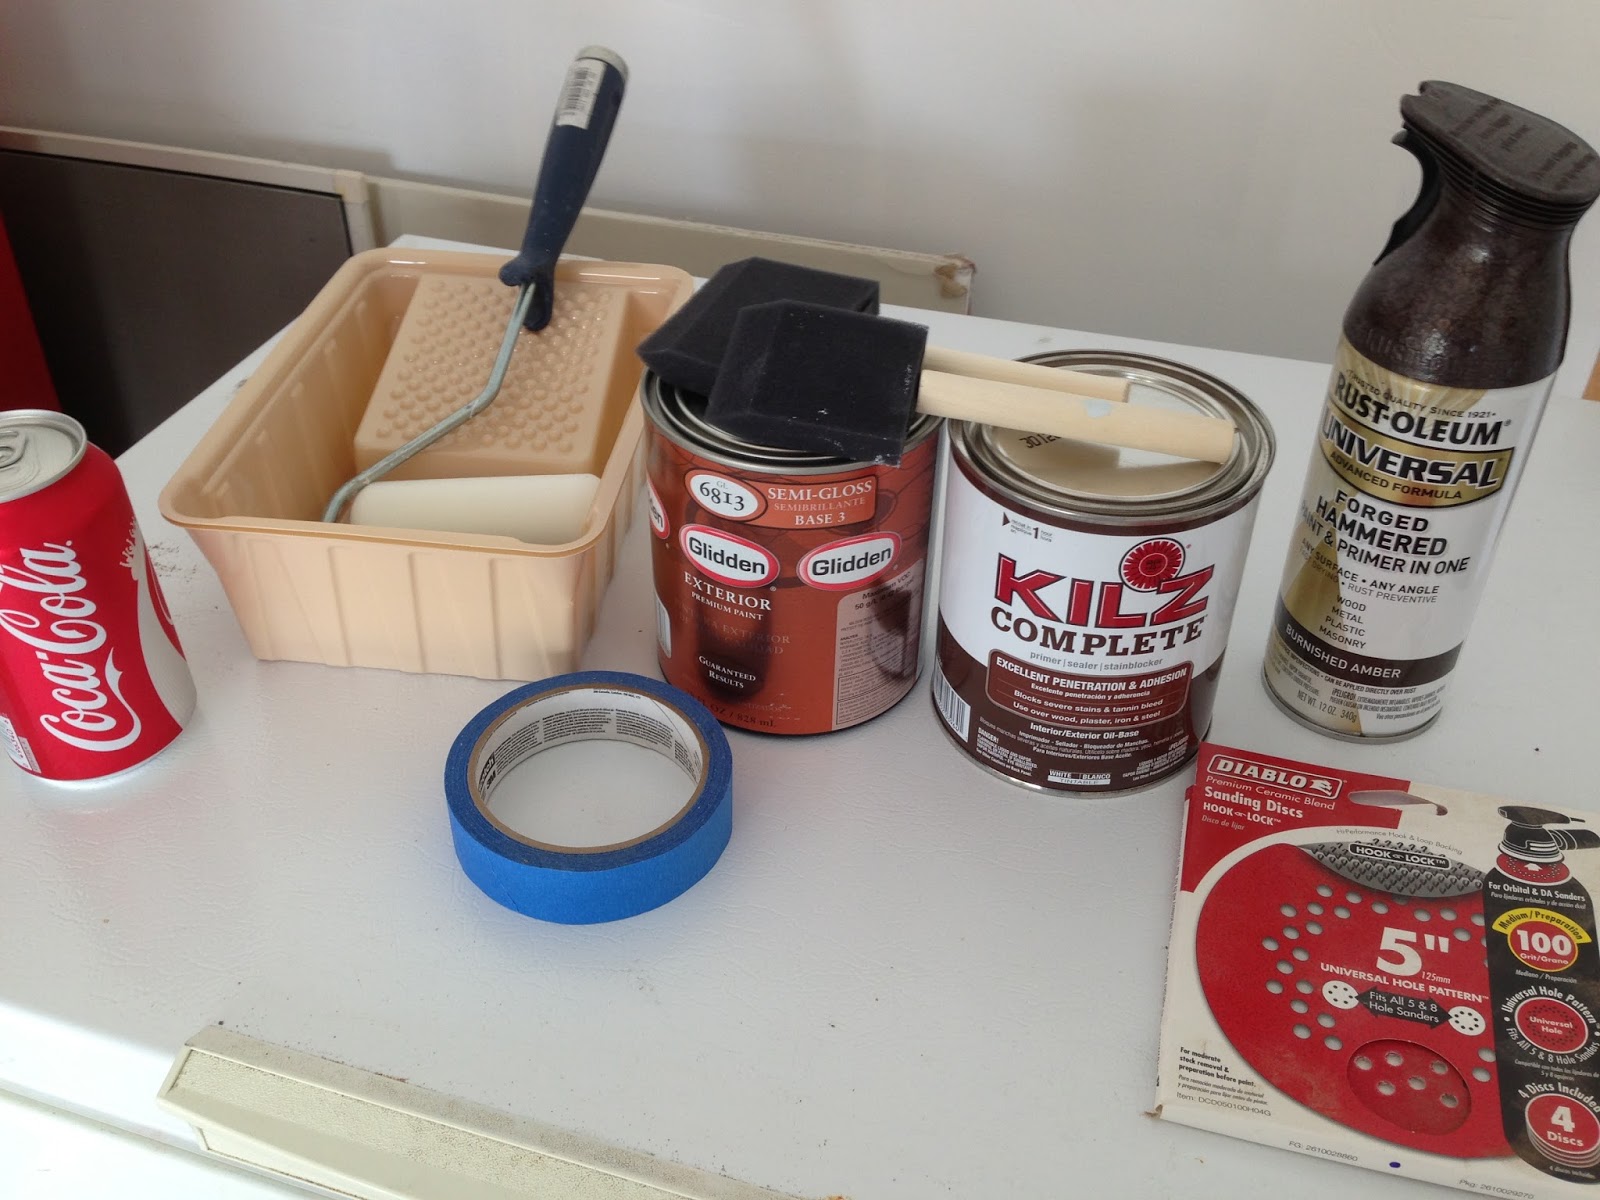
Supplies:
  • Exterior-friendly primer of your choice
  • Exterior-friendly paint of your choice
  • Paint tray
  • Foam roller
  • Foam brushes (later swapped out by my 2.5" angled Purdy brush, LIFESAVER.)
  • Painter's Tape
  • Wood putty (to fill any holes or gaps)
  • Sanding pads or a sanding block
  • If you're also changing out your hardware, gather up your new hardware or cheat and spray paint your existing stuff. I used Rustoleum Universal All Surface Forged Hammered Spray Paint and Primer In One in Burnished Amber.
You'll see that there is a can of Coke in the supply line-up. This is necessary. By the second day of door painting, you may want to replace it with a glass of wine. Or two glasses of wine. Either way.

"Second day?" You might be asking yourself, "But Brittany, surely you can knock this out in one day."

And surely you can, dear friends. That is why I am here to tell you my tale.

Tips to Save Your Sanity:
  • Oh, you're painting a black door red? Get gray-tinted primer. Covering black paint with white primer is a headache, but wait until you try to paint even coats of red paint over white primer. (Head = exploded.)
  • Electric sander in the house while two year old is napping is not a good idea.
  • Wrap your sanding disc around a sponge and BAM--sanding sponge/block/apparatus. Much better than suffering the wrath of cranky toddler.
  • For the love of all things good and nice in this world, use the right brushes and rollers. I THOUGHT I wanted foam brushes and rollers to minimize the look of brushstrokes, but brushstrokes would have been a welcome sight after the foam brushes soaked up too much paint and left MOUNDS of paint in the insets around my doors. At first I cried, then I wised up and grabbed the brush and smoothed everything out. I still used the roller for all of the raised parts, but the brush is the way to go for your insets.
And now, for some photographs:


Black door, brush-painted Oil Rubbed Bronze doorknob (It looks like it was a brushed nickel doorknob before and I definitely saw brushstrokes. Dislike.) . Keypad bolt lock installed by us (that's right, you don't get into our house without the magic passssssssword!). Brushstrokes all up in the door paint, cringe.

I removed the doorknob from the door (remembering carefully how I took it apart so I could get it back together again), and stuck both sides and the screws into a cardboard box that I had pre-punched holes in for ease of spray painting. And then I spray painted. Three light coats. I didn't remove our bolt locking mechanism from the door because I was afraid to take it apart and that it wouldn't work anymore. So I taped around it. It's a pretty close match to the doorknob, anyway.

Also, shortly after I sprayed on my first coat, the wind took my box
and promptly put my hardware into the dirt.
And then it rained.
Sign #64981647 that this was not my day.

Back to the door. I tried the electric sander to rough up the surface, but the tiny sleeping diva upstairs didn't appreciate it. So I made my own sanding block:


I should also note that the previous owners decided to put a screw and a washer in the door as a wreath hanger. Pardon me while I silently contain my rage.

I can't figure out what purpose the washer actually served.
My mind is boggled by this.


Patched with some wood putty. Sanded it down after the recommended drying time.


Three coats of primer later (and ALL DAY), I was at my wits end. Black was still bleeding through, the  last coat I was willing to paint on for the day wasn't drying nearly fast enough to be able to actually shut the door, and it was too late to take it off the hinges and replace with a piece of ply wood for the night since we had company on the way (and, not to mention, no ply wood). I was about to rip that door off its hinges and start a bonfire in my front yard.

After two coats of primer, some tears, and maniacal pulling out of my hair.
Here is my biggest tip to save your sanity so far:
  • When things aren't going your way, walk away. Take a break. Breathe. It is okay.
Luckily, our company stayed later into the night and gave my primed door the chance to dry enough so I could add my doorknob back and properly shut and lock the door at night. My uncle who is like, my painting hero, inspected my work and said as long as I sanded it down really well the next morning and took my time with the red, all would be well. That was a relief, and also why I was up at 7 AM the next day, clutching my paint brush like a woman on a mission.

Game. On.
Part two is coming up next, friends! Part one is already exhausting and I've lived through it once.

Psssst Check out part two here: How to Paint a Front Door Red and Save Your Sanity, Part Deux

Linking up with:
Confessions of a Plate AddictCity FarmhouseClean and ScentsibleYellow Bliss RoadElla Claire InspiredThe Blissful BeeSouthern LovelyFrench Country CottageBlissful and Domestic


Oooooof.

Have you ever tackled a project that tested your very core as a human being?

I'm in the middle of one of those right now.

Sheesh.