Monday, March 17, 2014

Building a Garden Wall - The Beginning

I had every intention of moving right along with the mudroom makeover this weekend. But when the forecast for your Saturday is sunny and 60 degrees followed by a forecast of 12 solid hours of snow, well...sometimes your plans change.

In my case, I was overcome with despair at the thought of MORE SNOW, so we decided to stick it to the man and get some work done outside on our beautiful day before round 65981 of snow fell.

More specifically, we were going to build ourselves a fancy garden wall in our front yard.

I know, so random, right?

I really have the hubster to thank for this idea, since in his many travels in his line of work he stumbles across some pretty cool stuff. He often comes home and tells me about antique stores, estate sales, and other goodies that I otherwise wouldn't normally know about.

So when he came home on Tuesday night and told me we could do some hardscaping on the cheap thanks to a supplier he found with a ton of discontinued pavers and garden blocks, I couldn't resist. Especially since the weather was going to be so nice. And especially especially since it was going to snow on Sunday night into Monday and this was the perfect opportunity to flip Old Man Winter the bird.


Early on Saturday, we took a quick 10 minute zip down the Garden State Parkway to the treasure trove of discontinued stone that was up for grabs:

Hello, I'll take you all.
 Peyton even got in on the action:

The guys in the sales office apparently couldn't resist this cute, seemingly innocent face, so they gave her a lollipop.
At 9 :00 AM.
 We quickly replaced the child with our garden wall blocks, 72 of them to be exact, for a whopping total of about $100.


And sloooooowly and carefully drove home. While it took us 10 minutes to get there, it took us about a half and hour to get back.

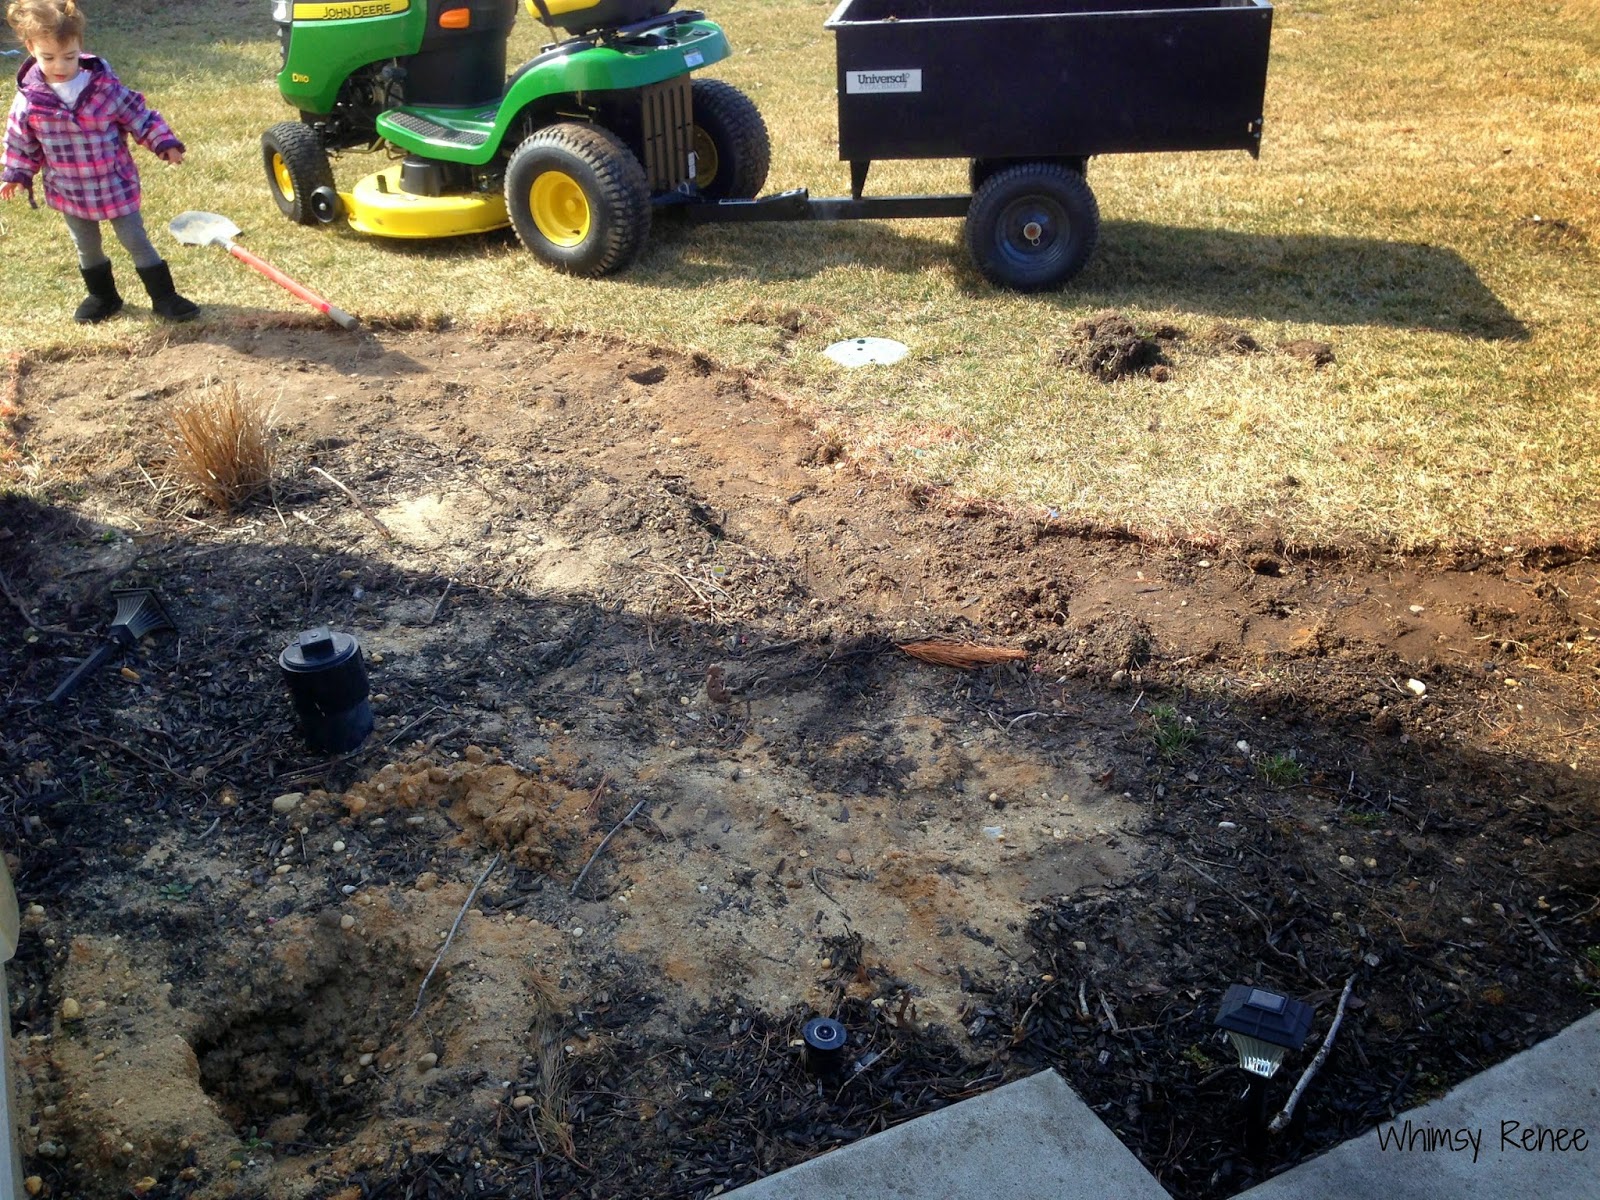
Once home, it was time to start digging out our new garden space. The photo below shows some progress on digging up the sod, but I basically followed the line we spray painted onto the grass. Also, looking at this photo now makes me cringe because we really left our garden bed to look like this all winter (well, when it wasn't covered by snow). Sorry, neighbors.


You guys, digging up sod is hard. It took me about an hour and a half to dig up enough sod to expand the garden bed to the size we wanted. 

And while I feel guilty about taking out some perfectly good grass, I did promise my pile of sad sod that I would plant beautiful things in it's place.

All dug up. 
 Seriously, I have the best little helper.


Once the sod was out and we had dug down about 4 inches from our border, it was time to turn our attention to our blocks. All 72 of them. I feel like I should warn everyone that you should a.) lift with your legs and b.) wear gloves. I did a.) and got a great leg work out (sore today!), but I didn't do b.) and now I have rough and scary man hands.


Getting the first row perfect is the hardest part. As long as the first row is level, your remaining rows will be level (science, sometimes you can't fight it).

To start, we shoveled some crushed concrete into the border of the bed, and used a hand tamper to pack it down. We tried to get it as level as possible here, which set up a good foundation for our blocks.


And then we started working our way down, checking the level with the addition of each new block and add or taking away some of the concrete until it was right, or using a rubber mallet to pound it into the concrete until it was level with its neighbor. Getting this first row level took about an hour and a half.


Rows 2 and 3 took about a half an hour combined.


 For this front section of the wall, we still need to cut some blocks in half to fit into the brick pattern we laid and find a nice matching stone to run down the walkway and along the house. These stones will need to be thinner because we have a sprinkler head 4 1/2 inches from the walkway.


Once that's done and after our frost-free date, we'll put some gravel down to help with drainage, layer on some topsoil and compost, plant my seedlings (which have ALL finally germinated!), mulch, and enjoy ourselves a fabulous raised garden bed. I can't wait to share the finished project with you!

And now I will present to you my view out the back door this morning.

Winter, you are killing my spirit.
Wanna see where I party? Click here for an awesome list of link parties I participate in..

Also linking up to:
Coastal Charm
Savvy Southern Style
Imparting Grace
Jennifer Rizzo

Friday, March 14, 2014

Five Friday Faves

Another Friday, another weekend!

We had a bit of a Spring teaser this week with temperatures on TWO days above 50 degrees (Tuesday was in the mid-60s!). Yesterday it was 30 degrees. Tomorrow is going to be in the high 50s, and the forecast is for rain AND snow Sunday into Monday.

I bum hard when I think about how some parts of the country haven't seen the temperature drop BELOW 50 degrees all winter (I'm looking at you, SoCal). I also realize that I talk a LOT about the weather on Fridays lately, but seriously Mother Nature, get your ish together and give me Spring NOW!

(cue foot stomping and pouting because I really just can't take it anymore)

Anyway, I have plans to keep on trucking with the mudroom makeover. I'll probably tackle upholstering that bench, finally. I've been saying I'll do it since we moved in, so we pushed it into the mudroom and there it sits, collecting dust and our stuff (but not anymore! Check out this post on how I am now keeping our crap off the bench!).

We also have plans to spend the majority of the day outside on Saturday working on the yard. We have plans to:

  • Dig out the new garden spaces in both the front and back yards and start prepping the soil for planting.
  • Smash up the concrete pad that sits smack dab in the middle of the back yard
  • Begin building the paver patio and fire pit over the spot where the concrete pad used to reside.
Now mind you, these plans did not actually occur until Tuesday evening. But there you go. Things are finally a-moving over here in this household, and I'm just going to run with it.

Here are my Five Faves for the week. I might be cheating and adding a couple of my personal photos, but I feel like they are up there on the faves list this week:


I love this pillow. Starburst patterns are so pretty, and the detail on it is just lovely.  


The adult sippy cup. I snagged this gem from the Atlantic City Home & Garden Show last weekend and I have every intention of putting it to good use while I dig and dig and dig and dig garden beds and curse the idea that I ever had a green thumb in the first place.


Contemporary Paints Stains And Glazes by Columbus Paint & Wall Coverings Sherwin-Williams
source

I am loving this paint by Sherwin Williams--Lighter Mint. The wheels in my head are turning for a room makeover for Peyton (maybe this summer?) and in my head this paint would look so pretty on her walls. She gets the best natural light in the house and this color would be a stunner as an accent wall.

 via Instagram

Peyton has been going to preschool for a little over the month now, and my heart just about explodes when she brings home her art. She is so proud of everything she creates on her own. I need to decide how to display this stuff and come up with a filing system for what she brings home, because mama ain't parting with any of it (someone call the production company for "Hoarders" now).


This Prisma Wall Decor from Urban Outfitters is super modern and way pretty. I've been seeing a few Himmeli wreath, mobile, ornament, and general decor tutorials floating around the interwebs that this could probably be DIYed with the right supplies and a little patience.

Hope you enjoyed my Five Faves for the week!

What's the weather like where you are? If it's nice, do you mind if I live vicariously through you until, oh I don't know, mid-May?


Wednesday, March 12, 2014

DIY Wall-Mounted Coat Rack

Phase One (of many phases, yowzers) of the mudroom transformation is complete!

I'm particularly excited about this project because this was my very first solo DIY. In the past, I've had the hubster help me when it came to the power tools, but this time I was determined to do this from start to finish myself. And while it's not perfect, it's a nice addition of functionality to the room that I can say I created myself! 

High fives, everyone--girls can use power tools too!


Previously, there was absolutely no sort of storage whatsoever in the mudroom. No hooks, no coat rack, no baskets, nothing. Things just kind of got piled up on the bench (which is really just an old coffee table that I have plans to upholster...stay tuned!) and looked cluttered and messy. That's why I made it my own personal mission to have the first project tackled in this room provide a means to keep things off the bench and looking tidy.


The supplies:

-1x6 whitewood board. I bought a whole board and cut it to size at home, but you could have it cut at Home Depot or Lowe's.

-Wall hooks of your choice. I used four of these in antique brass.

-Stain. I strayed from my usual Dark Walnut stain and went with Minwax English Chesnut. I give it two thumbs up.

-Wood screws

Not pictured:
-Saw (I used our circular saw)

-Foam brushes

-Drill

-Level

-Tape Measure

I started off by measuring my wall, and then measuring my wood pieces and making the required cuts. This was the first time I used the circular saw solo, but still had Denny supervise in case oh I don't know, I broke the saw or was going to cut off my hand, etc. etc. etc.


I gave the board a quick sanding, focusing really on smoothing out my cut edges, and then applied a coat of stain with a foam brush.


After about 15 minutes, I wiped off the leftover stain with an old t-shirt and was left with this finish:

It was also at this point that I kind of wished I had used wood conditioner. 
 I didn't want anything suuuuper dark because I knew these were going to be at eye level and didn't want to weigh down the room too much, but still add warmth against the cool tone of the paint. So, I decided that one coat would do it, and once it dried I applied two coats of Polycrylic.

Here comes the not so fun part--to me, anyway. I love painting things, I love staining things. I love thinking up new projects. I HATE measuring things. I understand that measuring things is a pretty essential piece to DIY, but I always freak myself out and second-guess and neurotically measure over and over and over again and then I mess myself up. I did my best to measure the spacing for each hook based on the measurement of each board AND keep them level, but unfortunately I let one hook get the best of me. Honestly, it's not super noticeable and once things are hung on it, you can't even tell.

But for real, friends, MEASURE THINGS. Channel your inner Ana White and do it right!

The level proved itself unnecessary to me since I apparently drill things to the beat of my own drummer.
But really, levels can be your friend. I encourage everyone to use them.


Once I had screwed all four hooks to the board, it was time to mount them to the wall. We decided to screw them directly into the wall, using the studs to provide the most support.

This is where I did bring in Denny for backup. He held the boards to the wall and made sure they were level, while I drilled them into the studs.

And here they are, hung up all pretty in the corner of our mudroom.

I implore you to forgive the lighting. This room is TINY,  impossible to photograph in one shot,
and has but one, sad, pathetic boob light.

And naturally, I couldn't wait to get things off my bench and onto those hooks!


The screws I used are SUPER silver, so I am in the process of tracking down a furniture stain touch-up pen to color in the screws so they blend in a little more. I got desperate and tried to use one of Peyton's magic markers--with no luck.

And there, my friends, is Phase One (Operation Get-Things-Off-the-Bench-Already) all wrapped up.

We still need to:

-Upholster the bench
-Add a shelf above the bench for a basket to hold hats, gloves, scarves, and other random smaller items
-Replace the sad little boob light
-Buy and DIY some art
-Figure out a ground-level storage solution for shoes

I am looking forward to getting this room done once and for all, and giving our home the functional (and pretty) mudroom it deserves.

How do you handle storage in your mudroom/entry? I'd love some suggestions!

Wanna see where I party? Click here for an awesome list of link parties I participate in..

Also linking up to:
Coastal Charm
Savvy Southern Style
Imparting Grace
Jennifer Rizzo


Monday, March 10, 2014

A Quick Note--Another Feature!

Hi again, friends!

I just noticed another one of my projects is featured over at Roadkill Rescue! I am loving the ingenuity and creativity of the features on this blog and am so so happy to be included among them! Feel free to go check it out if you have a minute.

This is the end of this public service announcement. Carry on with your Monday.

Starting Seeds For Amateurs

I like a pretty garden. Who doesn't?

I am completely and utterly smitten with pretty gardens. I have fond memories of my parents' gardens and all the weeding that came with it. My mom's garden seemed so effortless--she planted the plants, she sent me and my sister out to weed them every so often, and they lived! It was pure magic.

Fast forward to our first Spring in our new home and it was not at all like I expected it to be.

I guess maybe because I decided to start my plants from seeds? My parents always bought already established plants and transplanted them, but those costs can add up quickly. A packet of seeds will cost you only a couple bucks and you can save the seeds (within reason) for a couple of years. Being on a budget, this is awesome, plus you get to nurture little plants from tiny seedlings to big strong plants.

Just kidding, it didn't work out that way for me. You can read all the nitty gritty details of the epic failure of my first garden attempts and how I resolved to change that this year here,

I meant to share this last week, but thanks to the stomach bug from hell I was a bit out of commission. But over the weekend, we made some serious seedling progress (and had what could very well be my first fail), so I thought I'd share how to start seeds since this is the time to start. I'll check in periodically to let you all know if my garden is a barren wasteland of sadness, or if my plans actually worked out.

And here, my friends, is how to start seeds for an amateur. I make no claims to be a pro (and you'll see why), but I thought it would be fun to share what I'm learning as I go.


See those seeds in the photo above? Those are Calendula seeds and they are so delightfully creepy and curly that I think they are my favorite. I actually harvested these from the Calendula I started from seed last year...the only really successful starts I had.

And now, some steps:


1.) Gather your supplies. You'll need:

  • A good seed starting mix (don't use potting soil yet because it's too dense for little baby root systems)
  • A seed starting tray. This included the little cells for each seedling, a tray to hold them (and to water from underneath), and a dome to keep in the humidity during those important germination stages). You could get creative and use yogurt cups, smaller plastic cups, pots made out of newspaper, whatever you can find. You just want to make sure that whatever you use can drain easily, so you could poke some holes into the bottom of a plastic cup if that's what you're using.
  • Seed packets of your choice. Make sure you choose plants that will thrive in your agricultural zone.
  • A small shovel (but let's get real here and I'll admit I just used my hands)
  • Water
2.) Wet your seed starting mixture and mix it in a bucket. You don't want it to be absolutely soaking went, but you want it to clump together nicely. Add the mixture to your tray of cells or your cups or whatever it is that you're using.

This is a good time to label your cells/cups/whatever. Last year I failed to do this and just wrote out a diagram on a scrap piece of paper and then I lost it. Seedlings are tricky in that when they're itty bitty babies you have NO CLUE what they are unless you label them properly. 

I took popsicle sticks, broke them in half, and then stuck each half into the first cell at the top of a column. I labelled these A through J. Then I numbered down the left side of my tray, 1 through 5. Not only did I write it out on a scrap piece of paper, but this set-up also translates nicely to an Excel spreadsheet. My spreadsheet-lovin' self is totally down with that. Now I know what seeds are planted in each cell and it's saved in a Google docs spreadsheet--no more confusion and losing pieces of paper!

3.) Grab your seed packets and check how deeply each seed needs to be planted. For example, the delphinium and shasta daisy seeds said to cover with 1/8" of soil. So I poked my seeds into the cell with tweezers at about the suggested depth and covered gently with my finger, providing just enough pressure so the seed is making good contact with the seed starting mixture. Two to three seeds can be planted in each cell to ensure a better rate of germination, but they'll be thinned out later to one seedling per cell--so don't get too attached to each and every little seed.

As I planted, I made sure I wrote down on my paper what seeds were going into each cell. To make it easy on myself, I kept the columns the same type of seed:

Column A - Delphinium - I really have no hope of germination with these. I had read that they're difficult to start so if I really have no luck with them I'll plant some seeds in my garden in the fall as recommended to give them the winter to really develop.

Columns B and C - Shasta Daisy

Columns D and E - Oriental Poppy - these could have easily just been broadcast into my garden bed as I understand that they don't need too much to germinate.

Column F - Hollyhock - these can be directly sown, but I am impatient and just really wanted to see some green life happening.

Columns G and H - Calendula - again, I probably could have directly sown these, but there's the impatience showing through again. I know these are prolific germinators, so in a minute I'll show you why I really should have waited and just sown these directly.

4.) Add water to the bottom of the tray. Adding water directly to the seed starting medium will disrupt the seed, so bottom watering is much more gentle. Cover your tray with the provided plastic dome (or use plastic wrap if you are using individual cups) and place on a heating mat out of direct sunlight. I don't have a heating mat, so I stuck my tray on the top of my refrigerator. It's relatively dark up there and the heat from the fridge keeps things nice and warm.

Check your tray/cups/whatever you are using daily. Water as necessary, although the plastic covering will do a pretty good job of keeping the moisture in. 

As soon as you see green, uncover your tray and put in direct sunlight (a south-facing window or under a grow light).

This is where things get hairy for me. I had noted on my spreadsheet the estimated germination time of each seed as referenced on the seed packet. Each seed packets noted at least 7 to 14 day germination periods, so I thought my tray would be living on top of the fridge for at least a week and half before I started to see any tiny green leaves poking through.

I forgot to check my tray for two days, and when I peeked up there on Saturday afternoon:


This is once I moved it into the light and thinned out the super leggy seedlings, but you get the idea: progress!

Eeek! My Calendula seeds had germinated in 7 days and had already grown tall and spindly! This is referred to as a "leggy" seedling because the seedling will stretch for light if it doesn't receive as much as it needs. This is no bueno because the seedling will eventually flop over and probably die an untimely death.  Luckily, I was able to thin out the most leggy of seedlings to allow some of the shorter seedlings to remain, but I've got a few tall ones. I'm thinking I may transplant these into deeper cups a little lower to let the stem build some strength, cross my fingers, and hope that works. If that fails, then I can always directly sow the Calendula seeds into my garden after the danger of frost has passed.

You'll also see that I have germination in almost every column of my tray (except for--can you guess?--the delphinium seeds). The little flecks of green are reassuring that I'm not failing completely over here, and we've had a few more tiny leaves poke through the seed starting mixture since Saturday. This tray is currently sitting by my south-facing sliding glass door, so I'm hoping we won't have to rig up a DIYed grow light (this is on my list of things to do, but hasn't happened yet, unfortunately).

Once each seedling gets its second set of leaves, I will transplant these into potting mix in solo cups until they're ready to be planted in late April/early May.

Spring is on its way, friends!

Wanna see where I party? Click here for an awesome list of link parties I participate in..

Also linking up to:
Coastal Charm
Savvy Southern Style
Imparting Grace
Jennifer Rizzo


Friday, March 7, 2014

Five Friday Faves

Hello, friends, it's Friday again!

Maybe it was taking the day off on Monday due to the stomach bug from hell, but I am pleasantly surprised to see Friday here so quickly.

We've got quite a few plans for this weekend, including but not limited to:

Helping my sister paint her little one's nursery (!!!)
Visiting Peyton's pre-school for an open house event
Getting starting on installing coat hooks in the mudroom
Going to the Atlantic City Home and Garden Show

Whew. I know I am forgetting something and I am tired just thinking about it, but I do love busy weekends.

On to my five faves for the week. Enjoy!


I love a lot of things about this photo, but mostly I am loving the bar cart and those curtains! Sewn-on triangles in fun colors liven up a plain curtain panel like no one's business. I think these would look awesome in a big girl or boy's room.


Big ol' vine bunnies?! Pottery Barn kids, why?! My husband will never see the need, but THESE ARE SO DARLING. When I got my PB Kids catalog I'm pretty sure I stared at them for about ten minutes, rationalizing a purchase.


I love these cheerful little trinket dishes. They are too much fun!


I just cannot. So. Much. Cute.  I want to give it all the snuggles.


I love this Smith & Hawken boot tray from Target. Admittedly, this would have come in super handy this Winter, but I think it might find a home in the mudroom just in time for Spring.

That's it out of me for the day. Time to get on with Friday and get this weekend party started!

Anyone working on any projects this weekend? Share in the comments!


Wednesday, March 5, 2014

A Look Back at February

You guys.

I was totally priding myself on not having been sick since the start of the New Year. Everyone else was sick: Peyton, Denny, family members, every one I work with. I mistakenly gloated a wee bit too much last week and was smacked with a stomach bug the likes of which I have never seen over the weekend.

Karma, friends. Sometimes it's not good.

Anyway, I feel guilty about skipping my Monday post because I wanted to share my seed starting adventures with you (and maybe start a share-as-I-learn gardening series?), but I guess that might have to wait for another day because there are pictures to be edited and an entire post to write on that topic.

As for today, let's take a stroll down memory lane, shall we? A lane of short-term memory, if you will--February.


I think February was a good month for me. Around the middle of the month, I finally decided that my winter doldrums were not just going to go away on their own and I had to kick them out myself by getting my hands dirty and picking up the paintbrush again. This set the tone beautifully for March, because you know what time it is: Mudroom Makeover month!

I'm so excited to get started this weekend and share all the gory details with you, but let's take a look back at February: a glance in three acts:


This is where the vision for the month of March started: right here with this mood board. The room is already painted, it's just waiting for me to get on with it, already. I'll be building some wall hook boards this weekend and installing them, so yippeee! for this project officially being underway. Wanna check out the deets? See my mudroom inspiration mood board here.


My Wooden Ladder Turned Blanket Rack was a project saved from the "almost trash" pile in my garage and upped the cozy factor in my living room while at the same time giving me a place to store blankets without them being crumpled, sloppily draped messes on my couch.


The DIY Spoon Art Pottery Barn Knockoff is one of my favorite projects to date, I think. Not only did I get a look I was seriously pining for in my kitchen, but I was able to do it AND save $185 in the process. Not too shabby, huh? This project was also featured over at Knock Off Decor, which kind of made my day/week/month/year.

So, how was your February? Anyone staying healthy? Who is looking forward to Spring?

I know personally, I am more than ready for Daylight Savings Time--an extra hour of daylight starting Sunday--yeeeeah!

Wanna see where I party? Click here for an awesome list of link parties I participate in..

Also linking up to:
Coastal Charm
Savvy Southern Style
Imparting Grace
Jennifer Rizzo